Sunday, October 31, 2010
Wednesday, October 27, 2010
Cooking With Cricut Sweets and Treats
Challenge #3 - 2010 CD Case Halloween Picture Frame
"Sweets and Treats"
Welcome to all my Cooking With Cricut friends. Today I want to show you a fun CD Case picture frame that you can make and keep for years to come!
The year is on the back to remind you of the pictures that are on the front of your kids/grandkids/you from Halloween.
The year is on the back to remind you of the pictures that are on the front of your kids/grandkids/you from Halloween.
Recipe:
The card stock on the inside is orange. Cut to fit inside the CD case. Spray with 3M Spray Adhesive and sprinkled with silver glitter (if you want).
Inside Left: From My Kitchen Cricut cartridge- Candy
Paper Doll Dress Up Cricut cartridge- Bats
Trick or Treat- Stamp
Inside Right: Everyday Paper Dolls Cricut cartridge- Fireman
From My Kitchen Cricut cartridge- Sweets
Create a Critter Cricut cartridge- Mask
Lollipop- Stamp
Outside Left: Create a Critter Cricut cartridge- Pumpkins
American Crafts Premium Ribbon
Gypsy Font- 2010
Outside Right: Create a Critter Cricut cartridge- Pumpkins
Skittles
It closes for easy storage:)
***Just so you know, the photos are not from Halloween 2010. In fact, these are both old Halloween photos of my brother Dalton:) This project is a tribute to my brother Dalton. He is leaving for the Navy in less than two weeks now. If you would like to leave him a comment please leave one here! He reads my blog:) Thanks so much.
Be sure to stop by Cooking With Cricut and visit all the other Design Team members who are featuring projects today. In addition make sure to enter our challenge for a chance to win some fantastic prizes.
***Exciting news for me! I am also a guest designer on the Pink Cricut blog today:) How cool is that? If you get a chance, head back to my home page and scroll down one post and check out my project and leave me a comment:) You can also over to Pink Cricut and thank Sarah at Pink Cricut for giving me this awesome opportunity! She ROCKS!
Have a great day and thanks for stopping by.
~Madison
Guest Designer for Pink Cricut:)
I am honored and excited to have been asked by Sarah of Pink Cricut
to be a guest designer on her blog today.
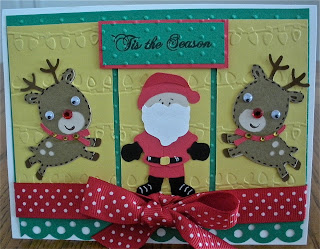
I really wanted to make a Christmas card to feature one of her stamps and I found the perfect stamp on the Simply Everything stamp set designed and sold by Pink by Design. Once I saw the "Tis the Season" stamp I knew what I wanted to do!
Recipe:"Tis The Season" Simply Everything Stamp- Pink By DesignChristmas Lights Cuttlebug Embossing Folder- New 7" border
Paper Doll Dress Up Cricut cartridge- Santa
Martha Stewart Scalloped Dot Border PunchCreate a Critter Cricut cartridge- Reindeer
Cuttlebug Swiss Dots Embossing FolderGoogly EyesGel PenRibbonGem
***A couple of tips: For added interest, I added gems for Rudolphs' noses and scarves.
When using the Christmas lights embossing border,
I alternated embossing and debossing the lights.
I used a gel pen on Santa's boots and belt, as well as around the Rudolphs.
Thanks for stopping by! Have a great day:)
~Madison
Tuesday, October 26, 2010
Throwback Thursday Challenge
This week's challenge was "Sports Mania." How could I miss entering this? Hmmm. Did you think I would make something volleyball related? You were RIGHT! I made a bookmark and decorated both sides. These photos are photos of the same bookmark- just the front and back:)
This is the front. I wasn't trying to make it look like Halloween! My school colors are orange and grey!
Here is the other side. My picture is at the top and the word "SETTER," my position, is underneath. Once again I did it in orange and grey because I have school spirit:)
Recipe:
Sports Mania Cricut cartridge- I Dig Volleyball
Plantin SchoolBook Cricut cartridge- "Setter," Star
Ribbon
Thanks for stopping by!
~Madison
Monday, October 25, 2010
Anything But A Card
Made By Momo Challenge- Bookmark
"Anything But a Card"
When asked to make something other than a card, I decided to make a bookmark. This is the front and back of the same bookmark. The boys I babysit for love to read and this was an easy decision! Since they are into sports and especially basketball, I chose to use the Sports Mania Cricut cartridge to cut out these basketball players to feature on the bookmarks. The card stock is Jen Wilson, Complete Boy.
Thanks for stopping by!
~Madison
Saturday, October 23, 2010
30 Minute Challenge
While broadcasting live on USTREAM, Robyn and Karlee made cards in under 30 minutes and challenged everyone else to do the same. The challenge was a color challenge and the cards needed to be pink, green, and purple.
When doing a timed challenge, it is best not to pick something too involved. I decided to make a simple "Friends" card. I didn't even use my Cricut for this card. I chose to use a purple stamped sentiment, a pretty pink and green gem flower, a few green Skittles and a green ribbon to say all I wanted to say:)
The pink card stock is punched with the Martha Stewart Scalloped Dot Border Punch and embossed with the Swiss Dots Cuttlebug Embossing Folder.
Thanks for stopping by!
~Madison
Wednesday, October 20, 2010
Pumpkin Patch
Cooking With Cricut DT Inspiration
Challenge #2
"Pumpkin Patch"
I am honored to have been selected as part of the Cooking with Cricut Design Team. Today I am participating in my first Design Team Challenge:) We were asked to create a "Pumpkin Patch" or "Pumpkin Carving" project to inspire you for this week's challenge. My design was made using the Cricut and Cuttlebug. This is how I plan to do all my projects. So for those of you who design and create projects using your Cricut I hope to be able to inspire you:)
This "Pumpkin Patch" card is a Side Step Card. I had never made one of these before and it looked really interesting so I thought I would give it a try. I must say it was really fun and not as hard as I thought it would be. If you would like to try one, click HERE to watch a tutorial on how to make a template. Make sure to come back and see how I embellished my card:) I am a fan of not so scary cards so I thought this would be fun to send to just about anyone.
Recipe:
Create a Critter Cricut cartridge- Pumpkins
Zooballoo Cricut cartridge- Grass
Going Places Cricut cartridge- Arrow
Swiss Dots Embossing Folder
Computer Generated Sentiment
Googly Eyes
Skittles
Gel pen
Make sure to check out all the other projects being presented this week on the Cooking with Cricut blog. I am excited to see what you will be submitting for your entry. Make sure to enter by Tuesday, October 26th at 8:00 pm. for a chance to win some great prizes.
One winner will receive these Digital Stamps or Cutting Files (winner’s choice) From:
Page-Kits.com
To enter head over to the Cooking with Cricut blog and follow all the directions. GOOD LUCK!!!! Thanks for stopping by!
~Madison
Tuesday, October 19, 2010
Monday, October 18, 2010
Time is Running Out!
Cooking with Cricut Challenge #1
 |
The 1st CWC challenge ends tomorrow night at 8:00pm!
You have one day left to submit your entries in order
to be eligible for some fantastic prizes.
We are excited to see all your finest....Love related projects. Things you love, people you love. Whatever makes your heart skip a beat!
The winners will be announced on Friday.
Please post only a new project related to this challenge. Incorporating other challenges is always fun and acceptable :-)
If possible, please try to use your Cricut (or other cutter).
Any type of paper craft project will be accepted. Layouts, cards, altered items. As long as it is paper related :-)
There Will Be Two Winners Chosen For This Challenge.
One will be random the other will be the Design Team Pick. Each winner will receive a:
$10 gift certificate from
Become a follower of Cooking with Cricut and leave a comment on the CWC blog and one lucky follower will receive two Cutting Files or Digital Stamps from Page-Kits.com
I am not a part of this week's challenge but be sure to check the Cooking with Cricut blog for inspiration from other DT members. My first design inspiration will be posted this Wednesday, October 20th. I am really excited to participate:)
~Madison
Winner of the Blog Hop Announced:)
Random Organizer helped me pick a winner today....
and the winner is....
LISA (Lamerlisa)... Congratulations Lisa!
Lisa said,"very cute... thanks for sharing! Hersey's chocolate!!!"
I will be sending you an email shortly.
Thank you again to all of you who participated in the blog hop this weekend:) I hope you were inspired! I know it was really fun for me to design and create the cards.
Thanks for all of your support!
~Madison
Friday, October 15, 2010
Fun-mare Before Halloween
Welcome to the Fun-mare Before Halloween Blog Hop hosted by the wonderful and oh so talented Jessica from KinderStampO. There will be a variety of Halloween projects to inspire you and awesome prizes from our terrific sponsors:
*Scrappy Moms *Unity Stamp Co *Peachy Keen Stamps *Helmar Adhesives
*Your Memories Here *Imaginisce *Sizzix
If you arrived here by chance, you might want to hop back to the beginning. Click HERE to find your way back to Jessica's blog. If you just came from Liz's Paper Loft, you are hopping in the correct order and I can't wait to show you what I have designed for this blog hop.
I decided to create two cards for those who might like to send a card at this time of year, but might not necessarily like all the scary things associated with Halloween. These are perfect for someone who is looking for a card to send to a friend or loved one who they won't see at Halloween:)
"Witching You Were Here"
The first card is a Joy-fold card.
Dimensions:
Black paper: 9" x 4.25" score at 3.5 (left side) - Large card
8.5" x 3" (fold in half) - Small card
Orange paper: 2 cuts of 4" x 2.75"
4" x 3.25"
5.25" x 4"
The orange paper gets attached to the black paper leaving a small border.
Remember, if you want to add ribbon to your card, you need to add it now before you attach the smaller card to the larger card. This opens to the left.
This is the pocket that will hold a hidden treat. You will also need to add 4 brads to attach a pocket to hold your treat. You can glue three of the sides but don't glue the top because you will need to be able to slide in your treat. This must all be done prior to attaching the smaller and larger cards together.
Now you can attach the smaller card (with the bow) to the larger card (which has been folded on the left side at 3.5". You can use your ATG gun or double sided tape, glue, etc... I placed my adhesive on the back of the smaller card and then placed it on the larger card.
Create a sentiment. This one says, "Since we are apart today And I cannot be there.
I thought I'd send a TREAT your way To show how much I care..." This goes on the side just opposite the pocket.
The inside left says "I miss you." The lovely and not so scary witch was cut from the Paper Doll Dress Up Cricut cartridge. She is 3" tall. Her legs were cut so that she could fit on the card, yet she could be big:) Although this is the inside left of the card, it is also the outside of the larger card before you attach the cards.
Here is the inside of the finished card with a hidden treat!!! On the left you will see a few bats of various sizes cut from the Paper Doll Dress Up Cricut cartridge. The bats have been stitched with a gel pen so that they pop off the page!
Materials:
12 x 12" piece of Cardstock
Coordinating Patterned Papers
Scoring tool
Paper Trimmer
Bone Folder
Adhesive
***Cut The 12 x12 Cardstock to 5 ½” x 12”
Place 5 ½” x 12" piece of cardstock horizontally in your Scoring tool and Score at 2”, 4”, 8” and 10”.
Turn cardstock a ¼ turn. Cut between the score marks at 2” and 10” @ 1 ½ “ from the top edge of the cardstock. Repeat on the other long side.
Fold (see pictures):
Place 5 ½” x 12" piece of cardstock horizontally in your Scoring tool and Score at 2”, 4”, 8” and 10”.
Turn cardstock a ¼ turn. Cut between the score marks at 2” and 10” @ 1 ½ “ from the top edge of the cardstock. Repeat on the other long side.
Fold (see pictures):
Using card base as a template, trace the section with the T-shaped fold onto patterned paper. If you wish to have an “edge” of the card base show, trim 1/16” to 1/8” off each side of the pattern paper. Using card base as a template, trace the section with the T-shaped fold onto patterned paper. If you wish to have an “edge” of the card base show, trim 1/16” to 1/8” off each side of the pattern paper.
Cut 2 Pieces of patterned paper 2" x 5 1/2" or to leave an edge cut 1 3/4" x 5"
Cut 2 Pieces of patterned paper 2" x 2 1/2" or to leave an edge cut 1 3/4" x 2"
Cut 4 pieces of patterned paper 2" x 1 1/2" to cover the base of the cardstock. Or to leave an “edge” cut pattern paper 1 3/4” x 2”
Cut 2 pieces of patterned paper 1 1/2” x 4” to cover the base of the cardstock. Or to leave an “edge” cut pattern paper 1 3/8” x 3 3/4”
Cut 1 piece of patterned paper 2 1/2” x 4” to cover the base of the cardstock. Or to leave an “edge” cut pattern paper 2 3/8” x 3 ¾”
Dry fit all of the pieces before adhering to card base. Once You know it fits go ahead and adhere all pieces down.
***This tutorial is from Jill The Scrapoholic. Thank you Jill for letting me post this to my blog today:) Jill taught me how to make Tri-fold cards and I love them!!
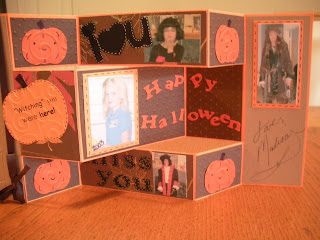
This "Witching You Were Here" card is for my dad. It has been personalized with Halloween pictures of the two of us from the past. You can do with with a friend or family member that may be away from you this Halloween! (By the way, this is just an example and my dad is really here with me!)
This is really easy to do if you have a scanner and a printer. Scan in old Halloween photos. Print on white card stock and cut to size. It is that simple. These are much clearer looking in person. It was hard to photograph and I got a lot of glare. Since I was going for more of a fall look, something less scary, I used matching pumpkins cut from the Create a Critter Cricut cartridge to decorate the card. It is a bit hard to see in the photo, but the front of the card is embossed with one of the new Cuttlebug Embossing Folders. It shows a house in the woods and it looked perfect for this card.
*****BLOG CANDY ALERT*****
Here is your chance to win some candy:) I am offering two ink pads and a stamp, as well as a homemade Halloween card. All you have to do to be eligible is leave me a comment on this post and become a follower. Tell me what you favorite Halloween candy is....
Don't forget to make your way over to Martha's awesome blog to see what she has created!!
Don't forget to make your way over to Martha's awesome blog to see what she has created!!
Here is a list of the very talented crafters participating in this blog hop:
***Jessica - Don't miss this page! Don't miss this page!
***Make sure you visit this last page to have a chance to win an additional prize:)
***Make sure you visit this last page to have a chance to win an additional prize:)
Thanks for stopping by today. Have a great weekend.
~Madison
Subscribe to:
Posts (Atom)
>


