Friday, July 30, 2010

FCCB Challenge

FCCB Challenge #20 - At the Zoo:)
This week the challenge at FCCB was to create a card or project with an animal and it had to include a Cricut cut out. I have been wanting to make a card for a friend of mine who I haven't gotten to see much lately so this was perfect. I hope she likes it:)

Cricut cartridges used:

Create a Critter - Bird

The bird's friend Mr. Grasshopper was cut out of paper and I added googley eyes to both just because I think it makes them look so cute:)

Let me know what you think. I always love reading your comments. Have a great day.
~Madison


Having Fun in the Summer Sun

Last FRIDAY FB Challenge
Good Friday afternoon. In case you missed it, last FRIDAY on my Face Book Fan Page I was challenged to create a card with a water or beach theme. I came up with this idea because as I was sitting around trying to figure out what to make I sure wanted to be eating a piece of watermelon! For those of you who are new to my blog, each FRIDAY I have a FRIDAY Challenge on my FB Fan Page and I earlier in the week I ask my followers to post comments with suggestions or ideas for themes, colors, shapes, or whatever they want to see me create that coming FRIDAY. Sometime over the weekend, but most often by FRIDAY, I post a card or project based on my followers' suggestions.

This week I was asked to make a card using vegetables because a lot of people are gardening right now. I am almost done with my card and I will be posting it on my Face Book Fan Page soon.

Hope you are all having a wonderful day.
~Madison


Thursday, July 29, 2010

Made for Brent and Nikki Moore by Frank Lee Speaking
Made for Marley by Cynthia Tint

Wednesday, July 28, 2010

Christmas Around The Clock...#24

Simple Little Luminaries
For my final project in the Christmas Around the Clock Cuttlebug Challenge, I was asked to make a luminary. This was new to me! I loved how this turned out. It was really a lot easier than it looked. You can click HERE for a tutorial of the project.

For my project, I designed the image using two Cricut cartridges, Winter Woodland for the ice skater and Wall Decor and More for the border. I welded them together using the Gypsy. After I glued them to the velum I put the entire project through the Cuttlebug so that it could all be embossed. I love how this looks:) I used to Swiss Dots embossing folder.

Please remember to use battery operated candles only:)

These 24 challenges have been a great learning experience for me. I have has a lot of fun. I hope you enjoyed my projects. Remember, I will be participating in the "Kids Just Want to Have Fun" Blog Hop sponsored by KinderStampO Septemper 11-13. This blog hop will include lots of great projects for you to do with your kids:) Thanks for all of your support!
~Madison


Christmas Around The Clock...#23

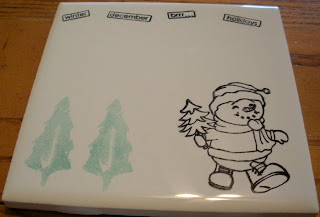
Christmas Gift Tile Coasters
This was really fun! I have never inked a tile before. The coolest thing ever is that if you make a mess while your inking you can just wipe it off!!! It's like you didn't even make a mess. Nothing will become permanent until you bake it in the oven:) Here is the tutorial I followed for the challenge so that you get all the directions (click HERE).
I used the Peachy Keen Snowman Stamp in the right corner and some smaller Christmas word stamps along the top.
I made my own Christmas tree stamps using foam and the Winter Woodland Cricut cartridge:) I cut two trees from the cartridge using the deep cut blade. I glued them together so that they were a bit thicker. Then I mounted them to the sticky paper so I could use them with my acrylic block. I stamped two trees on the tile using green ink:) I'm thinking about adding a snowflake above the trees but it is a little difficult to cut. Well, one more project and my 24 hours Around the Clock will be complete. I have all the materials now so the finished project will be posted soon. Stay tuned! Merry Christmas in July.
~Madison

Tuesday, July 27, 2010

Made for Marley by Crystal Shafter

Need ideas for kid projects?

Plan to join us once again as we hope to inspire you with a
blog hop designed to showcase projects for kids:)

Click HERE

This blog hop, "Kids Just Want to Have Fun," will take place September 11- 13. More details coming soon. Hope you plan to follow along.
~Madison


Christmas Around The Clock...#22

Christmas card with a scene
This was a really cool challenge. The challenge was to take an embossing folder and ink it. Once done, put it behind a cut out to create a scene on a Christmas card. I had an embossing folder with a picture of a bird on a branch and snowflakes which reminded me of Christmas. I used green and red ink to add color to the inside of the embossing folder. When I embossed the white paper, it left green and red color on the paper to accent the embossing.
You can see in this close up the hints of the green and red ink on the embossing folder. I took red paper and layered it over the embossing folder to create the scene. I added the green border to look like a photo frame. The white stitching ties the card together. The ink washed off of the embossing folder without to much trouble. I have to say, this was easier than I thought it would be. I liked how it turned out. For a complete tutorial of this project you can click HERE. Merry Christmas in July:)
~Madison


Winners of the Blog Hop Announced:)

It is time to announce the winners of the "15 Days of Christmas" Christmas in July Blog Hop.

But before I do.... I want to thank each and everyone of you who visited my blog, became a follower, if you weren't already a follower, and took the time to follow us as we presented 15 fantastic Christmas projects. I special thank you to Jessica at KinderStampO for hosting the event. It takes a lot of work to host a blog hop and we appreciate all the hard work that Jessica did.

And now the moment you have been waiting for....

The first winner of a set of three gift card tags (your choice) is...

Carolyn.... Carolyn said, "Madison, I would so love to win these. This takes gift cards to a whole new level. Great job! tfs."

(Carolyn, please leave me an email address within two weeks so that I can get a hold of you. If not, I will randomly generate an alternate winner).

The second winner of a set of three gift card tags (you choice) is...

Terrie B. from crafteecards.blogspot.com. Terri said, "These are gorgeous.. and such a great idea!! I'm excited about this hop.. HERE WE GO! Lol."

Congratulations to both winners! And thanks again to everyone who hopped along. Look for another awesome blog hop coming this September. More details soon. For all you moms out there you won't want to miss this one:)

~Madison

Christmas Around The Clock...#21

Wearable Art
For this challenge we were asked to create a piece of wearable art that had been embossed with the Cuttlebug:) Now that's a challenge!!! The inspiration piece that was shown was amazing. Check out this piece of Wearable Art. Well, I chose to make a pair of funky earrings:)
I used both the Spots and Dots and the Swiss Dots Cuttlebug embossing folders. I designed the earrings with the Gypsy using the Create a Critter Cricut cartridge. Merry Christmas in July.
~Madison


Christmas Around The Clock...#20

Christmas Holiday Photo Album
I really love this idea:) For this challenge we could cover either a photo album or a book with a Christmas theme. I chose to cover a journal since that is what I would give to my friends:) We love to write in journals and we would use this to add pictures and write about what we did over Christmas break. We take lots of pictures so this could be both a journal and a photo album.
I covered the spine with green paper that I embossed with the Cuttlebug Swiss Dots embossing folder. The color is a bit off in the picture, but in person, the contrasting paper looks really cool. I added a red ribbon to tie it all together. And of course, I added a cute little snowman (pop dot) embossed with Cuttlebug Swirls and a snowflake to finish it off.

The Peachy Keen snowman stamp repeats down the side of the spine for added interest. Merry Christmas in July.
~Madison


Christmas Around The Clock...#19

Snowflake Card
This challenge was all about the snowflake:) We were asked to make a card with a snowflake on it and this is what I came up with! I like having a bit of a 3D effect so I curl the ends of the snowflakes so that they pop off of the paper. Wow, 19 hours of the Christmas Around the Clock challenge finished... and just five more hours to go.

I keep getting asked how I have so much time to do this! For those of you who are new to my blog, I am a sophomore in high school and I started my blog and card business so that I could earn extra money to play club volleyball:) If you have a moment you can see my cards in a slideshow on the right sidebar and my volleyball info. on the left sidebar. I am still selling my cards as I want to play club again this year.

Thanks for stopping by and Merry Christmas in July:)
~Madison

christmas Around The Clock...#18

Christmas Themed "Z Fold" Card
I am really learning a lot while creating all of these projects. I have never made a "Z Fold Card." I followed the tutorial that you can find if you click HERE (scroll almost to the bottom of the page).
I chose to add these cute Peachy Keen stamps for my snowmen but I decided to leave them whiter so that they didn't overpower the card. I added just a bit of embossing on the border using the Cuttlebug Swiss Dots embossing folders. Merry Christmas in July.
~Madison


Christmas Around The Clock...#17

Star Shaped Card
I have never made a star shaped card before. This was really fun! I used the Gypsy to design and weld to stars together to create this card. The cut came from the Stand and Salute Cricut cartridge. The snowman is from the Winter Woodland Cricut cartridge and the snowflakes are from the Going Places Cricut cartridge. I used the Swirl Cuttlebug embossing folder to emboss the blue paper. I curled the snowflakes so that they stand up off the card for added interest. Merry Christmas in July.
~Madison


Christmas Around The Clock...#16

Christmas Tag
For this Christmas Around the Clock challenge I was asked to make a Christmas tag using my scraps. If you could see my craft room you would know that after making 15 other projects there are scraps everywhere! I used a green theme for the tag. The tag and the background for the stamp were cut from the Winter Woodland Cricut cartridge. The stamp is from Peachy Keen! Merry Christmas in July.
~Madison


Monday, July 26, 2010

Christmas Around The Clock...#15

Oh Christmas Tree
This Christmas challenge was to make a 3D Christmas Tree! I decided to make one big tree with little trees all over it:) Of course, I had to use the Cuttlebug to emboss every side. Each side was different! I added put a big yellow star on top using the Wall Decor and More Cricut cartridge:) This was really interesting to make:)
~Madison


Christmas Around The Clock...#14

Two Cards from one file
Look closely and you will see that these two cards are made from the same file. I used the Gypsy to design the words "Tis the Season" from the Zooballoo Cricut cartridge and the "Christmas Tree" from the Winter Woodland Cricut cartridge. The negative of one card was used to make the other card. Can you tell which card uses the negative? It is the card on the left:)
If you look closely you will see that I filled in the negative with blue and green paper. I embossed the red background with the Cuttlebug Swiss Dots embossing folder. I stitched the words for added interest.
For this card I used the actual words and Christmas tree that I cut out to make this card. Again I embossed the card with the Cuttlebug Swiss Dots embossing folder. I added a white ribbon and bow and white stitching. This was a fun challenge too:) Thanks for looking. Merry Christmas in July.
~Madison


Christmas Around The Clock...#13

3 Minute Magic Cake
Yummy! What a treat for me:) This challenge, which if done in order, would have been my last challenge. I was asked to make this 3 minute cake, eat it and take a picture of myself eating it:)

I was told to:

Grab a nice big mug, and add:
4 tablespoons of flour
4 tablespoons of sugar
2 tablespoons of cocoa
and 3 tablespoons of chocolate chips
Stir well.

In this mug mix the dry ingredients with:
1 egg, 3 Tablespoons of Milk
2 Tablespoons of Oil
Mix with fork until fluffy.
Set mug on microwave safe plate
(because it will rise up above the mug, and might dribble over). Cook in microwave for 3 minutes.
Enjoy! It is even more scrumptious with ice cream :)

I think if you gave this to a friend for Christmas they would be HAPPY! Merry Christmas in July.
~Madison


Christmas Around The Clock...#12

Create "Lot Cards"
"Lot cards" have a repeatable pattern. When you make cards with a repeatable pattern it is quicker and easier to make more than one card at a time. In the cards I made for this challenge, I repeated the tree and the sentiment but changed the color of the sentiment paper.
I also repeated the placement of the ribbon but I changed the ribbon color.
You can see that I used the Cuttlebug to emboss the background of each card, but I used a different embossing folder for each card.
Instead of sitting and thinking about three different cards, I just thought of one card design but made it three different ways:). And with that....I believe I am half way around the clock!! Wow, I can't believe it. 12 more projects to go. Can that be possible? We will see. Keep following and I will keep posting. Merry Christmas in July.
~Madison

Christmas Around The Clock...#11

Resist Snowflake
Well, I had never heard of the resist snowflake technique, but this challenge was to create a card using the resist snowflake technique. You can learn all about how to do this by clicking HERE and scrolling about half way down the page.

To make this card I followed the tutorial by Bonnie McLain. I used three different Cuttlebug embossing folders. I found my snowflake on the Going Places Cricut cartridge.
Merry Christmas in July. Thanks for following.
~Madison


Christmas Around The Clock...#10

Christmas Gift Bows for Your Packages
Check out these directions on how to make your own Christmas bows:) I have never done this before and it was actually pretty easy! Click HERE and scroll down for the directions! This challenge was to create your own bow using two sided paper. So next time you are out of bows, just make one! Merry Christmas in July:)
~Madison


christmas Around The Clock...#9

How to Incorporate Snowmen into your Holiday Decor
This was a fun challenge:) I decided to incorporate snowmen into my holiday decor (I'm 15, do I really have holiday decor?) by creating this vase that can be displayed on a table or counter or where ever you have some extra room:) I simply took a bud vase and filled it about 1/3 with uncooked pinto beans. I added my snowmen that are attached to stir sticks (like the kind you would use in coffee) and some pretty ribbon and there you have it.
Here is a close up of the snowmen. They are made using the Winter Woodland Cricut cartridge. Since this is a Cuttlebug challenge, I thought it would be really cute to emboss the snowmen. I used two different folders. The bodies are embossed with Swirls and the hats are embossed with Swiss Dots. I used googly eyes for a bit of interest:) I really enjoyed this project and liked how it turned out. Merry Christmas in July. Keep watching for more fun holiday projects.
~Madison


Christmas Around The Clock...#8

Sandee's Christmas Challenge
Sandee asked for a Christmas card using white with only one other color and adding either glitter or a gem somewhere. As you can see, I used white with green and added two gems in the middle of the hearts.

This card was made using the Winter Woodland Cricut cartridge for the word "Peace" and the Sweethearts Cricut cartridge for the doves. The paper is punched with the Martha Stewart Scallop Dot Edge Punch. This in one of my favorite punches and I use it a lot!

Merry Christmas is July. Keep following along. More to come. The day is just beginning.
~Madison

Christmas Around The Clock...#7

Belly Band Stationery
So, if you want a cool gift idea for the writer in your family, here it is. You can create this all in one stationery kit. You can make gift cards, add the envelopes and stamps and even a place to hold everything:) If you want to learn how to make this project, you can click HERE:)
When you open it up you see that there are three pockets. One for cards, one for envelopes, and one for stamps.
The stamps are at the top. They barely show in the photo. I put the envelopes next and then added the cards I made. I wrapped mine with a band I made using the adorable reindeer from the Create a Critter Cricut cartridge. Once again, Merry Christmas in July and stay tuned for more to come.
~Madison


Christmas Around The Clock...#6

Christmas In July CD Photo Frame
Good morning, well I am ready to start my day creating more Christmas Around the Clock projects from the Cuttlebug Challenge:). I was next challenged to make this CD Photo frame. It is a double sided project and when not out for Christmas it is made so that it will close without bending or ruining the paper or any of the design:) I chose a blue and white theme for the front with Christmas characters. Photos can be placed over any of the white characters and they will become the background. I would probably choose to use a wallet size photo, one on each side.

For the back I added the year that I made it and a cute little penguin that I made using the Create a Critter Cricut cartridge. Since I don't have any Christmas ornaments I made my own. I cut out a circle using the Plantin SchoolBook Cricut cartridge and added a couple of swirls that I made using the Wall Decor and More Cricut cartridge that I won on a My Pink Stamper give-a-way! Thank you Robyn!!!! This project can be set out at Christmas for a decoration:) Look for more around the clock projects as the day goes on. Merry Christmas in July!
~Madison

Sunday, July 25, 2010

Christmas Around The Clock...#5

Ornament Tin
The Cuttlebug challenge this time was to make an ornament and to include an embossed item in the background. It is hard to tell from my picture (it is getting late and the pictures are getting darker) but I used the Swirl embossing folder to emboss the tree that I cut out using the Winter Woodland Cricut cartridge. I added the snowman to my ornament and some gems. I also used spray glue and sprinkles for snow.
I added candy cane paper to wrap the entire project and tied it up with pretty silver ribbon. I have the clear lid but it was getting late and it was hard to see the details in the pictures with the lid on. Merry Christmas in July.
~Madison


Christmas Around The Clock...#4

Yummy For the Tummy:)
How about wrapping up candy bars and giving them out as special treats for Christmas gifts to friends, classmates, family, or co-workers? You will be a hit!!! You can put them all in a basket and they will look great. It is easy to do. You can wrap regular size or king size bars!! Simply add a sentiment and you are good to go:)
I chose to use a puppy theme with this puppy paper. I cut out this adorable dog from the Create a Critter Cricut cartridge. I added a computer generated sentiment, "You gotta love candy...It brings out the puppy within you!" I wrapped my candy bar added a ribbon to secure it. On to the next project. Keep following. And... Merry Christmas in July.
~Madison


Christmas Around The Clock...#3

Embossing Your Layouts
My task this time was to create a scrapbook page layout and to include 2 items that are embossed. One had to be a punch.
Here is a close up of the snowflake that was embossed using the Cuttlebug Swiss Dots embossing folder.
I used the Spots and Dots Cuttlebug Embossing Folder to emboss both the red letters and the punch.
If you have been following from Project #1, you will know that I am doing Christmas projects Around the Clock as a challenge from Cuttlebug. You can check it out HERE. Stay tuned. More projects on the way. Merry Christmas in July.
~Madison


>
 

Funky Cards Copyright © 2010 Designed by Ipietoon Blogger Template Sponsored by Emocutez